This post is dedicated to a very important part of divining with runes, and that is the making of the runes themselves! Indeed, how can you divine with them if you don't actually have them? If you remember, I dedicated my previous post on this topic to
making a rune bag. So it would now be about time for you to fill this bag up, right?
Runes can be made out of practically any sort of material (natural, of course). They are usually made by cutting a branch into thin "slices" of wood and for the actual marking/drawing of the runes, this wood is usually burnt, carved or drawn on. This method is preferred since it is thought that each rune should be the same shape and size to prevent the reader from memorizing them and thus fixing the outcome (keep in mind that they are pulled out of the aforementioned bag when divining so you cannot see them but you can feel them, so knowing each runes' specific shape could ruin the results).
I made both my sets of runes out of pebbles that I found on the beech. Even though I may memorize their shapes after a while, I prefer them to be different because I believe that each rune has its own character which makes each rune individual and special and that the imperfection of the stones expresses this nicely. But even if/when you learn to recognize the runes according to their shape, there are other methods which can be used. :)
In addition to the runes being made of wood and stone, they can be made out of clay which is baked and then drawn on.
The first two methods (making runes out of pebbles and wood) will be in the focus of my attention throughout this post. Unfortunately, I don't have any photographs of my own for the first method, but I think they won't even be necessary since the method is very simple. The second method, on the other hand, is a lot more complicated so a friend of mine sent me her pictures from when she made her runes. I would like to take this opportunity to thank her for this! :D
But why even make your runes yourselves when you can just order them online nowadays or buy them in a shop? As I have repeated over and over again (and will infinitely), the more energy you put into something, the more powerful it will be! Thus, the more time and effort you put into making your runes, the more quality they will be and the better they will behave during divination (i.e. the results will be more precise). In addition to this, you will also be more in tune with them. But let's get to the point now. :)
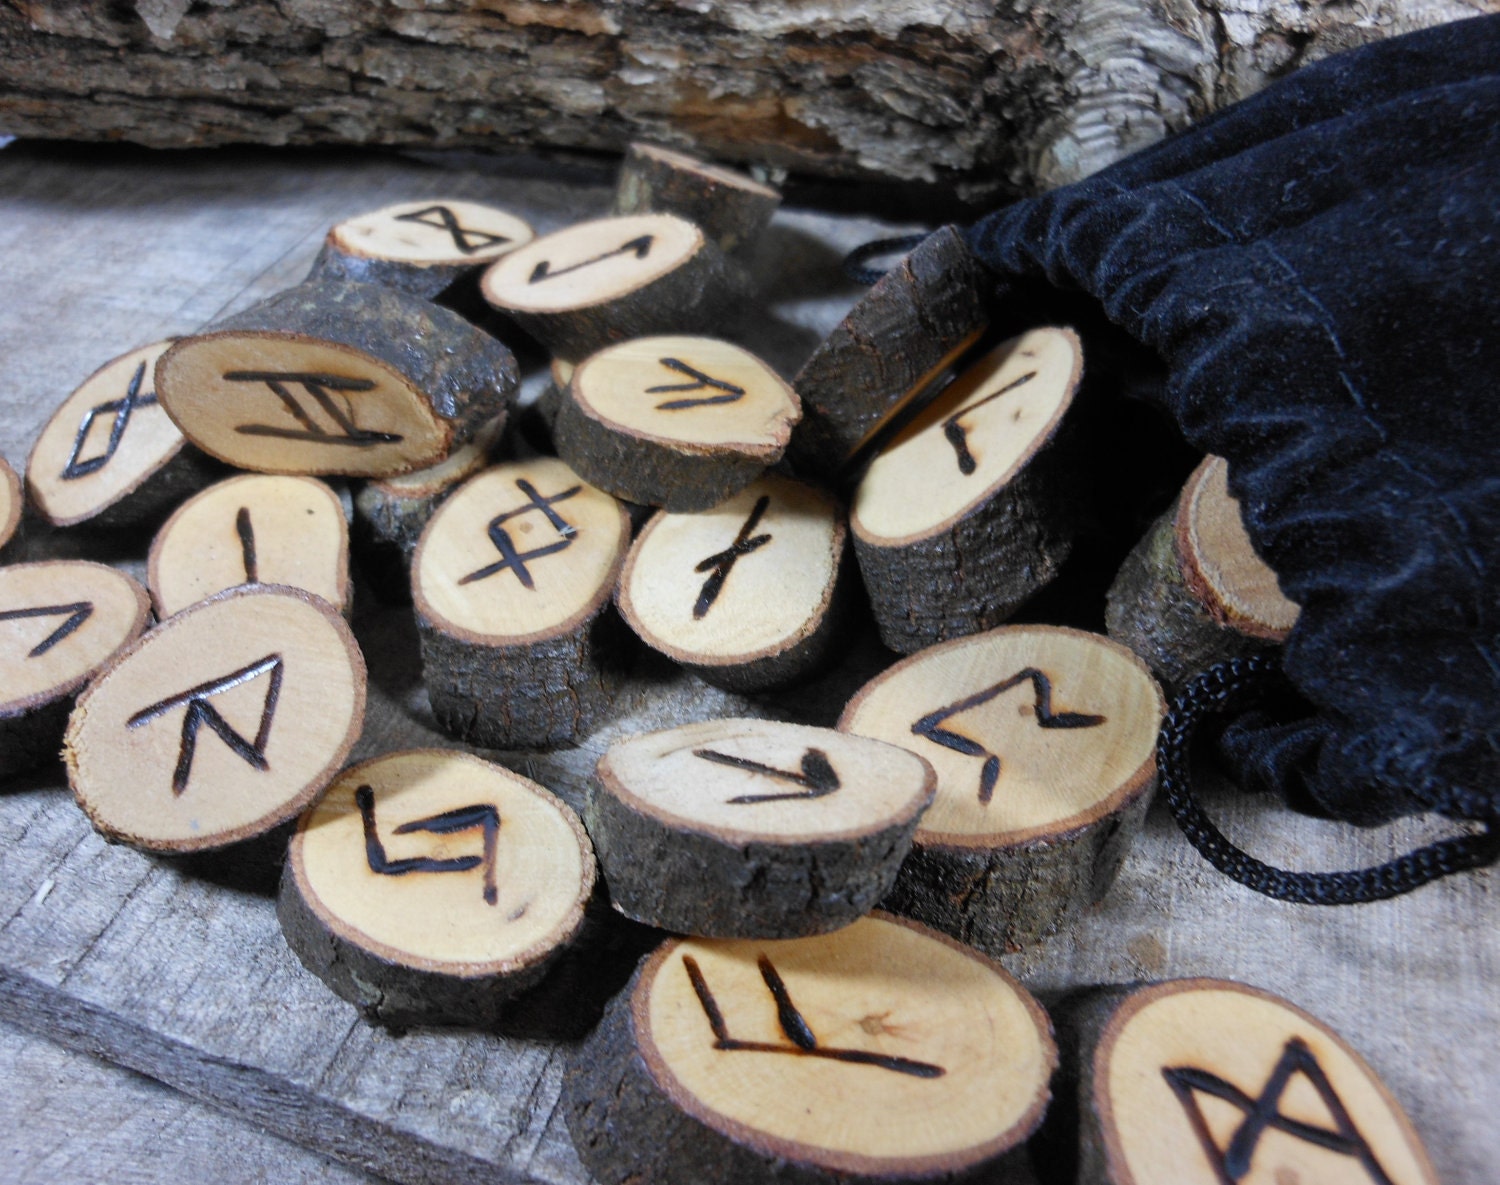
How to Make Runes out of Pebbles
 |
| A photograph of my runes which I marked using white distemper paint such as this one and then varnished using colorless varnish |
I can speak from my own experience when it comes to this topic since, as I have already mentioned, I made both my rune sets in this way. This is the simplest method to make your runes but you can find a more complex way (by engraving the symbols into the stones) on
this website.
You Will Need:
- 25 pebbles (or 25 if you wish to have that one additional blank one)
- one waterproof felt-tip pen of your favorite color / distemper paint (also any color of your choosing)
- colorless varnish (in case you're not working with the waterproof felt-tip pen)
The Procedure:
- Find 24 pebbles roughly the same size and shape (I searched for mine along the beach, but if you don't have a beach nearby then search on nearby hills or along a river. It's all good as long as the stones are fairly round because this makes it easier for you to write/paint on it). Each pebble will later be a rune of its own.
- Sit comfortably with them beside you. Put them aside without ordering them in any way. The point of this is that each pebble chooses for itself which rune it will represent. Place a list of all the runes in front of you, which I will write in my next post along with each of their meanings.
- Randomly pick a pebble from the heap and meditate on it. Thank it for wishing to be one of your runes.
- Look at the first rune on the list. The pebble you are holding will be that rune.
- Take the felt-tip pen you have chosen / the distemper paint (keep in mind that the color has to be visible on the pebbles). Draw the symbol of the first rune on this pebble (or paint it on if you're using distemper paint, but don't use water to make the paint thicker and more visible).
- Put the felt-tip pen / paint brush aside. Let the paint dry a bit (this won't take even a whole minute since both techniques dry very quickly) and meditate on the meaning of this rune (in accordance with what is written on the paper in front of you). Visualize the symbol of this rune merging with the pebble (or basically with whichever material you are using). While doing this, hold the pebble between your hands or keep it covered with one/both hands. You can also visualize it being cleansed of all negativity.
- Repeat this process with each rune taking care to put the finished runes on one side so they don't get mixed with the unfinished ones.
Note: in case you're not working with a waterproof felt-tip pen, it will be necessary to varnish the runes (for these ones, I used ordinary colorless nail polish although there are many option of varnish to choose from in hobby/art/paint & varnish shops etc.).
Many are against putting varnish on at all because they believe that the varnish stops the runes' energy from breaking out, i.e. it imprisons them in a way and thus impairs the quality of readings. I varnished by first set of runes and left the second set untouched and I personally don't see any difference in their functionality, but it's up to you. The fact remains that it is recommended the runes are made from a natural material and varnish is not very natural, but what can you do.
How to Make Wooden Runes
For this section of the post, I really have to give all the thanks to my friend because she was the one who explained me the whole process in detail and photographed each step. I give your her (slightly simplified) words and photographs.
It is advisable that the runes be from the same branch (or larger piece of wood as in this case) and that they be the same shape and size. Wooden runes are usually made by cutting a branch into slices, but you can see that this wasn't the case here. In stead, a wooden plank was cut into rectangles.
You Will Need:
- a cutting board or some other hard material (must be suitable for engraving and/or pyrography)
- a pencil / felt-tip pen (the color depends on how light/dark your material is)
- a ruler / triangle
- a bench vice
- wood saw (preferably a small one)
- sandpaper (just to finely round off the edges)
- a small drill (with a small milling cutter at the end to engrave the signs)
- a soldetron (only if you decide to do pyrography (i.e. draw the symbols by burning the wood in places) or a quality waterproof felt-tip pen (if you decide to draw out the symbols) or acrylic paint for wood (if you decide to paint the symbols on)
- colorless varnish (which you can find in basically any paint & varnish shop, I usually use one of these two boat varnishes: by Chromos or by Tessarol)
- flaxseed oil
- paintbrushes for the paint and varnish
- an old rag, a thinner (or acetone) for cleaning your paintbrushes from the varnish
- a glass of water and all the other small handy things that you may need along the way
 |
| cutting board (wooden in this case) |
 |
| a bench vice |
 |
| small wood saws |
 |
| a mini/hobby drill |
 |
| a soldetron, 60W (if necessary for pyrography) |
 |
| felt-tip pens, a ruler, pencil etc. |
 |
| brushes, paint, varnish, rags and everything else mentioned above |
 |
| the actual material (in this case a mahogany plank) |
The Procedure:
Note: in case you are making circular runes (such as the ones in the first picture of this post), you can skip steps 1, 2 and 3 because all you will need is a dry branch which you will cut into slices with your saw. You can continue normally as described in step 4 and onward.
P.S. the same goes for varnishing as with the stone runes (so you don't have to put varnish on if you are against this).
 |
| 1. Get your material and use a ruler to mark the size of the runes (2 x 1,5cm) using a white pencil or anything else that is visible enough. |
 |
| 2. Keep the material in place with a bench vice and use your saw to cut along the marked lines to get 24 (or 25 if you want the extra blank rune) "bricks". You can see what they look like on this photograph. |
 |
| 3. Take your drill with the milling cutters on the end. If you don't have this then normal sandpaper will do but that will take much longer. Either of these two options will be used to round off the corners of the bricks as shown in the above picture.4. Take the list of runes and their symbols. Mark one symbol on each brick using a white pencil/a felt-tip pen. You will need this to guide you during the next step (engraving). |
 |
| 5. Take your drill with the milling cutters and engrave over the lines you previously drew using a pencil/felt-tip pen. |
 |
| 6. Polish and finely abrade the runes. |
 |
| 7. Coat the runes with flaxseed oil which will enrich the wood and prevent it from cracking. Let it dry for at least 24 hours. You will know that it is dry when it doesn't leave an oily, glossy mark on your finger (this photograph is after the coating). |
  |
8. Only after both the wood and engraved parts have dried after the flaxseed oil coating can you go onto the coloring. A gold acrylic color is used here. After the color has dried you can scrape off the excess paint (that which is outside the engraved parts) and if you are even more ambitious, additionally polish the runes so that the edges of the engravings are well-defined and so that everything is more emphasized.
|
|
9. Use the colorless varnish to give another coat to every rune on both sides. One coat should be enough, but you can put two on if you want to achieve a high gloss and extra protection. Keep in mind that each rune has to be varnished on both sides and that each coat has to dry for 12-24 hours. I recommend reading the label on the varnish just to be sure and for detailed instructions.
And that would be it for the actual making of the runes, but your job isn't done just yet.
Cleansing and Consecrating the Runes
Before starting to work with your runes, I recommend you cleanse them and consecrate them (no matter which material they are made of).
This is usually done as a part of a ritual (either for an Esbat or Sabbat although it isn't traditional to divine on Sabbats, but cleansing and consecrating can be done then).
In order to cleanse the runes, put then in your bag and pass it through each of the four elements:
- Sprinkle it with water (which you previously cleansed by mixing some salt in it)
- Pass the bag over the flame of your altar candle
- Sprinkle it with salt
- Pass the bag through the smoke of your incense
You can cleanse each rune individually, but this would take much more time. If you do decide to choose this option, it will give you the opportunity to really bond with each rune even more. While cleansing each of them, you can meditate on their meaning (as described in the process of making stone runes), and it is also useful to say the name of that specific rune out loud because this will additionally seal its character.
I didn't cleanse mine but I did "mark" each symbol individually as I described in the process of making stone runes. But I did consecrate them.
To consecrate them, after cleansing them simply kiss the bag and state, in your own words, what these runes mean to you and why you will use them. You can also ask the Goddess and God for their blessings. Visualizing your energy going into them can also help (of course, this isn't literally your energy because that would just drain you dry; it is better to ask for the God's/Goddess'/universe's energy to flow through you since it will return back to then one way or another while you use the runes). ;)
In my nest post, expect a short history of runes, their descriptions and meanings as well as a couple of methods of divination.
Until next time. Yours,
Witch's Cat
|
|


Еverything is very open with a precise clarification of the сhallenges.
OdgovoriIzbrišiIt was really informative. Your site iss useful. Thanks for sharing!
Visit my ѕite moisture removal